TiDB Binlog 教程
本文档主要介绍如何使用 TiDB Binlog 将数据从 TiDB 推送到 MariaDB 实例。文中的 TiDB Binlog 集群包含 Pump 和 Drainer 的单个节点,TiDB 集群包含 TiDB、TiKV 和 Placement Driver (PD) 各组件的单个节点。
希望上手实践 TiDB Binlog 工具的用户需要对 TiDB 架构有一定的了解,最好有创建过 TiDB 集群的经验。该文档也有助于简单快速了解 TiDB Binlog 架构以及相关概念。
该文档假设用户使用的是现代 Linux 发行版本中的 x86-64。示例中使用的是 VMware 中运行的 CentOS 7 最小化安装。建议在一开始就进行清洁安装,以避免受现有环境中未知情况的影响。如果不想使用本地虚拟环境,也可以使用云服务启动 CentOS 7 VM。
TiDB Binlog 简介
TiDB Binlog 用于收集 TiDB 中二进制日志数据、提供实时数据备份和同步以及将 TiDB 集群的数据增量同步到下游。
TiDB Binlog 支持以下功能场景:
- 增量备份,将 TiDB 集群中的数据增量同步到另一个集群,或通过 Kafka 增量同步到选择的下游。
- 当使用 TiDB DM (Data Migration) 将数据从上游 MySQL 或者 MariaDB 迁移到 TiDB 集群时,可使用 TiDB Binlog 保持 TiDB 集群与其一个独立下游 MySQL 或 MariaDB 实例或集群同步。当 TiDB 集群上游数据迁移过程中出现问题,下游数据同步过程中可使用 TiDB Binlog 恢复数据到原先的状态。
更多信息参考 TiDB Binlog Cluster 版本用户文档。
架构
TiDB Binlog 集群由 Pump 和 Drainer 两个组件组成。一个 Pump 集群中有若干个 Pump 节点。TiDB 实例连接到各个 Pump 节点并发送 binlog 数据到 Pump 节点。Pump 集群连接到 Drainer 节点,Drainer 将接收到的更新数据转换到某个特定下游(例如 Kafka、另一个 TiDB 集群或 MySQL 或 MariaDB Server)指定的正确格式。
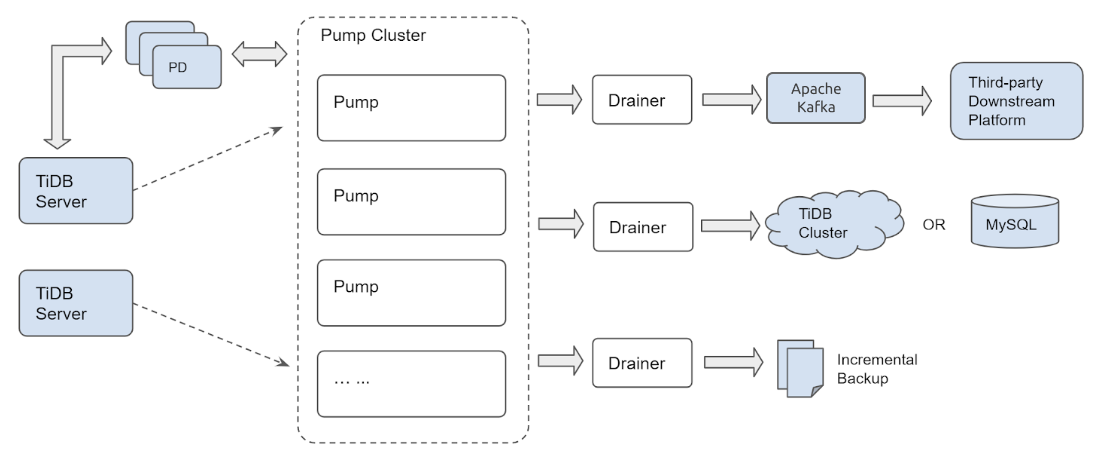
Pump 的集群架构能确保 TiDB 或 Pump 集群中有新的实例加入或退出时更新数据不会丢失。
安装
由于 RHEL/CentOS 7 的默认包装库中包括 MariaDB Server,本示例选择的是 MariaDB Server。后续除了安装服务器,也需要安装客户端。安装指令如下:
sudo yum install -y mariadb-server
curl -LO https://download.pingcap.org/tidb-community-server-v7.6.0-linux-amd64.tar.gz | tar xzf - &&
cd tidb-latest-linux-amd64
预期输出:
  % Total    % Received % Xferd  Average Speed   Time    Time     Time  Current
                                 Dload  Upload   Total   Spent    Left  Speed
100  368M  100  368M    0     0  8394k      0  0:00:44  0:00:44 --:--:-- 11.1M
配置
通过执行以下步骤配置一个 TiDB 集群,该集群包括 pd-server、tikv-server 和 tidb-server 各组件的单个实例。
- 填充配置文件:
```bash
printf > pd.toml %s\\n 'log-file="pd.log"' 'data-dir="pd.data"' &&
printf > tikv.toml %s\\n 'log-file="tikv.log"' '[storage]' 'data-dir="tikv.data"' '[pd]' 'endpoints=["127.0.0.1:2379"]' '[rocksdb]' max-open-files=1024 '[raftdb]' max-open-files=1024 &&
printf > pump.toml %s\\n 'log-file="pump.log"' 'data-dir="pump.data"' 'addr="127.0.0.1:8250"' 'advertise-addr="127.0.0.1:8250"' 'pd-urls="http://127.0.0.1:2379"' &&
printf > tidb.toml %s\\n 'store="tikv"' 'path="127.0.0.1:2379"' '[log.file]' 'filename="tidb.log"' '[binlog]' 'enable=true' &&
printf > drainer.toml %s\\n 'log-file="drainer.log"' '[syncer]' 'db-type="mysql"' '[syncer.to]' 'host="127.0.0.1"' 'user="root"' 'password=""' 'port=3306'
```
- 查看配置细节:
```bash
for f in *.toml; do echo "$f:"; cat "$f"; echo; done
```

预期输出:

```
drainer.toml:
log-file="drainer.log"
[syncer]
db-type="mysql"
[syncer.to]
host="127.0.0.1"
user="root"
password=""
port=3306

pd.toml:
log-file="pd.log"
data-dir="pd.data"

pump.toml:
log-file="pump.log"
data-dir="pump.data"
addr="127.0.0.1:8250"
advertise-addr="127.0.0.1:8250"
pd-urls="http://127.0.0.1:2379"

tidb.toml:
store="tikv"
path="127.0.0.1:2379"
[log.file]
filename="tidb.log"
[binlog]
enable=true

tikv.toml:
log-file="tikv.log"
[storage]
data-dir="tikv.data"
[pd]
endpoints=["127.0.0.1:2379"]
[rocksdb]
max-open-files=1024
[raftdb]
max-open-files=1024
```
启动程序
现在可启动各个组件。推荐启动顺序依次为 Placement Driver (PD)、TiKV、Pump(TiDB 发送 binlog 日志必须连接 Pump 服务)、TiDB。
- 启动所有服务:
```bash
./bin/pd-server --config=pd.toml &>pd.out &
```

```
[1] 20935
```


```bash
./bin/tikv-server --config=tikv.toml &>tikv.out &
```

```
[2] 20944
```


```bash
./pump --config=pump.toml &>pump.out &
```

```
[3] 21050
```


```bash
sleep 3 &&
./bin/tidb-server --config=tidb.toml &>tidb.out &
```

```
[4] 21058
```
- 如果执行
jobs,可以看到后台正在运行的程序,列表如下:
```bash
jobs
```

```
[1]   Running                 ./bin/pd-server --config=pd.toml &>pd.out &
[2]   Running                 ./bin/tikv-server --config=tikv.toml &>tikv.out &
[3]-  Running                 ./pump --config=pump.toml &>pump.out &
[4]+  Running                 ./bin/tidb-server --config=tidb.toml &>tidb.out &
```

如果有服务启动失败(例如出现 “`Exit 1`” 而不是 “`Running`”),尝试重启单个组件。
连接
按以上步骤操作后,TiDB 的 4 个组件开始运行。接下来可以使用以下 MariaDB 或 MySQL 命令行客户端,通过 4000 端口连接到 TiDB 服务:
mysql -h 127.0.0.1 -P 4000 -u root -e 'select tidb_version();'
预期输出:
*************************** 1. row ***************************
tidb_version(): Release Version: v3.0.0-beta.1-154-gd5afff70c
Git Commit Hash: d5afff70cdd825d5fab125c8e52e686cc5fb9a6e
Git Branch: master
UTC Build Time: 2019-04-24 03:10:00
GoVersion: go version go1.12 linux/amd64
Race Enabled: false
TiKV Min Version: 2.1.0-alpha.1-ff3dd160846b7d1aed9079c389fc188f7f5ea13e
Check Table Before Drop: false
连接后 TiDB 集群已开始运行,pump 读取集群中的 binlog 数据,并在其数据目录中将 binlog 数据存储为 relay log。下一步是启动一个可供 drainer 写入的 MariaDB Server。
- 启动
drainer:
```bash
sudo systemctl start mariadb &&
./drainer --config=drainer.toml &>drainer.out &
```

如果你的操作系统更易于安装 MySQL,只需保证监听 3306 端口。另外,可使用密码为空的 "root" 用户连接到 MySQL,或调整 `drainer.toml` 连接到 MySQL。


```bash
mysql -h 127.0.0.1 -P 3306 -u root
```

预期输出:

```
Welcome to the MariaDB monitor.  Commands end with ; or \g.
Your MariaDB connection id is 20
Server version: 5.5.60-MariaDB MariaDB Server

Copyright (c) 2000, 2018, Oracle, MariaDB Corporation Ab and others.

Type 'help;' or '\h' for help. Type '\c' to clear the current input statement.

MariaDB [(none)]>
```


```sql
show databases;
```

预期输出:

```
+--------------------+
| Database           |
+--------------------+
| information_schema |
| mysql              |
| performance_schema |
| test               |
| tidb_binlog        |
+--------------------+
5 rows in set (0.01 sec)
```

如下表格是包含 `checkpoint` 表格的 `tidb_binlog` 数据库。`drainer` 使用 `checkpoint` 表格,记录 TiDB 集群中的 binlog 已经更新到了哪个位置。


```sql
use tidb_binlog;
```

```
Database changed
```


```sql
select * from checkpoint;
```

```
+---------------------+---------------------------------------------+
| clusterID           | checkPoint                                  |
+---------------------+---------------------------------------------+
| 6678715361817107733 | {"commitTS":407637466476445697,"ts-map":{}} |
+---------------------+---------------------------------------------+
1 row in set (0.00 sec)
```

打开另一个连接到 TiDB 的客户端,创建一个表格并插入几行数据。建议在 GNU Screen 软件中操作,从而同时打开多个客户端。


```bash
mysql -h 127.0.0.1 -P 4000 --prompt='TiDB [\d]> ' -u root
```


```sql
create database tidbtest;
```

```
Query OK, 0 rows affected (0.12 sec)
```


```sql
use tidbtest;
```

```
Database changed
```


```sql
create table t1 (id int unsigned not null AUTO_INCREMENT primary key);
```

```
Query OK, 0 rows affected (0.11 sec)
```


```sql
insert into t1 () values (),(),(),(),();
```

```
Query OK, 5 rows affected (0.01 sec)
Records: 5  Duplicates: 0  Warnings: 0
```


```sql
select * from t1;
```

```
+----+
| id |
+----+
|  1 |
|  2 |
|  3 |
|  4 |
|  5 |
+----+
5 rows in set (0.00 sec)
```

切换回 MariaDB 客户端可看到新的数据库、新的表格和最近插入的行数据。


```sql
use tidbtest;
```

```
Reading table information for completion of table and column names
You can turn off this feature to get a quicker startup with -A

Database changed
```


```sql
show tables;
```

```
+--------------------+
| Tables_in_tidbtest |
+--------------------+
| t1                 |
+--------------------+
1 row in set (0.00 sec)
```


```sql
select * from t1;
```

```
+----+
| id |
+----+
|  1 |
|  2 |
|  3 |
|  4 |
|  5 |
+----+
5 rows in set (0.00 sec)
```

可看到查询 MariaDB 时插入到 TiDB 相同的行数据,表明 TiDB Binlog 安装成功。
binlogctl
加入到集群的 Pump 和 Drainer 的数据存储在 Placement Driver (PD) 中。binlogctl 可用于查询和修改状态信息。更多信息请参考 binlogctl guide。
使用 binlogctl 查看集群中 Pump 和 Drainer 的当前状态:
./binlogctl -cmd drainers
[2019/04/11 17:44:10.861 -04:00] [INFO] [nodes.go:47] ["query node"] [type=drainer] [node="{NodeID: localhost.localdomain:8249, Addr: 192.168.236.128:8249, State: online, MaxCommitTS: 407638907719778305, UpdateTime: 2019-04-11 17:44:10 -0400 EDT}"]
./binlogctl -cmd pumps
[2019/04/11 17:44:13.904 -04:00] [INFO] [nodes.go:47] ["query node"] [type=pump] [node="{NodeID: localhost.localdomain:8250, Addr: 192.168.236.128:8250, State: online, MaxCommitTS: 407638914024079361, UpdateTime: 2019-04-11 17:44:13 -0400 EDT}"]
如果结束 Drainer 进程,集群会改进程设置“已暂停(即集群等待 Drainer 重新加入)”的状态。
pkill drainer &&
./binlogctl -cmd drainers
预期输出:
[2019/04/11 17:44:22.640 -04:00] [INFO] [nodes.go:47] ["query node"] [type=drainer] [node="{NodeID: localhost.localdomain:8249, Addr: 192.168.236.128:8249, State: paused, MaxCommitTS: 407638915597467649, UpdateTime: 2019-04-11 17:44:18 -0400 EDT}"]
使用 binlogctl 的 "NodeIDs" 可控制单个对应节点。在该情况下,Drainer 的节点 ID 是 "localhost.localdomain:8249",Pump 的节点 ID 是 "localhost.localdomain:8250"。
本文档中的 binlogctl 主要用于集群重启。如果在 TiDB 集群中终止并尝试重启所有的进程,由于 Pump 无法连接 Drainer 且认为 Drainer 依旧“在线”,Pump 会拒绝启动。这里的进程并不包括下游的 MySQL 或 MariaDB 或 Drainer。
以下有三个方案可解决上述问题:
使用 binlogctl 停止 Drainer,而不是结束进程:
./binlogctl --pd-urls=http://127.0.0.1:2379 --cmd=drainers &&
./binlogctl --pd-urls=http://127.0.0.1:2379 --cmd=pause-drainer --node-id=localhost.localdomain:8249
在启动 Pump 之前先启动 Drainer。
在启动 PD 之后但在启动 Drainer 和 Pump 之前,使用 binlogctl 更新已暂定 Drainer 的状态。
./binlogctl --pd-urls=http://127.0.0.1:2379 --cmd=update-drainer --node-id=localhost.localdomain:8249 --state=paused
清理
在 shell 终端里可启动创建集群的所有进程(pd-server 、tikv-server、pump、tidb-server、drainer)。可通过在 shell 终端中执行 pkill -P $$ 停止 TiDB 集群服务和 TiDB Binlog 进程。按一定的顺序停止这些进程有利于留出足够的时间彻底关闭每个组件。
for p in tidb-server drainer pump tikv-server pd-server; do pkill "$p"; sleep 1; done
预期输出:
[4]-  Done                    ./bin/tidb-server --config=tidb.toml &>tidb.out
[5]+  Done                    ./drainer --config=drainer.toml &>drainer.out
[3]+  Done                    ./pump --config=pump.toml &>pump.out
[2]+  Done                    ./bin/tikv-server --config=tikv.toml &>tikv.out
[1]+  Done                    ./bin/pd-server --config=pd.toml &>pd.out
如果需要所有服务退出后重启集群,可以使用一开始启动服务的命令。如以上 binlogctl 部分所述,需要先启动 Drainer 再启动 Pump,最后启动 tidb-server。
./bin/pd-server --config=pd.toml &>pd.out &
./bin/tikv-server --config=tikv.toml &>tikv.out &
./drainer --config=drainer.toml &>drainer.out &
sleep 3
./pump --config=pump.toml &>pump.out &
sleep 3
./bin/tidb-server --config=tidb.toml &>tidb.out &
如果有组件启动失败,请尝试单独重启该组件。
总结
本文档介绍了如何通过设置 TiDB Binlog,使用单个 Pump 和 Drainer 组成的集群同步 TiDB 集群数据到下游的 MariaDB。可以发现,TiDB Binlog 是用于获取处理 TiDB 集群中更新数据的综合性平台工具。
在更稳健的开发、测试或生产部署环境中,可以使用多个 TiDB 服务以实现高可用性和扩展性。使用多个 Pump 实例可以避免 Pump 集群中的问题影响发送到 TiDB 实例的应用流量。或者可以使用增加的 Drainer 实例同步数据到不同的下游或实现数据增量备份。