Integrate TiDB with ProxySQL
This document provides a high-level introduction to ProxySQL, describes how to integrate ProxySQL with TiDB in a development environment and a production environment, and demonstrates the key integration benefits through the scenario of query routing.
If you are interested in learning more about TiDB and ProxySQL, you can find some useful links as follows:
What is ProxySQL?
ProxySQL is a high-performance, open-source SQL proxy. It has a flexible architecture and can be deployed in several different ways, making it ideal for a variety of use cases. For example, ProxySQL can be used to improve performance by caching frequently-accessed data.
ProxySQL is designed from the ground up to be fast, efficient, and easy to use. It is fully compatible with MySQL, and supports all of the features you would expect from a high quality SQL proxy. In addition, ProxySQL comes with a number of unique features that make it an ideal choice for a wide range of applications.
Why ProxySQL integration?
- ProxySQL can help boost application performance by reducing latency when interacting with TiDB. Irrespective of what you are building, whether it is a scalable application using serverless functions like Lambda, where the workload is nondeterministic and can spike, or if you are building an application to execute queries that load tons of data. By leveraging powerful capabilities of ProxySQL such as connection pooling and caching frequently-used queries, applications can gain immediate benefits.
- ProxySQL can act as an additional layer of application security protection against SQL vulnerabilities such as SQL injection with the help of query rules, an easy-to-configure feature available in ProxySQL.
- As both ProxySQL and TiDB are open-source projects, you can get the benefits of zero vendor lock-in.
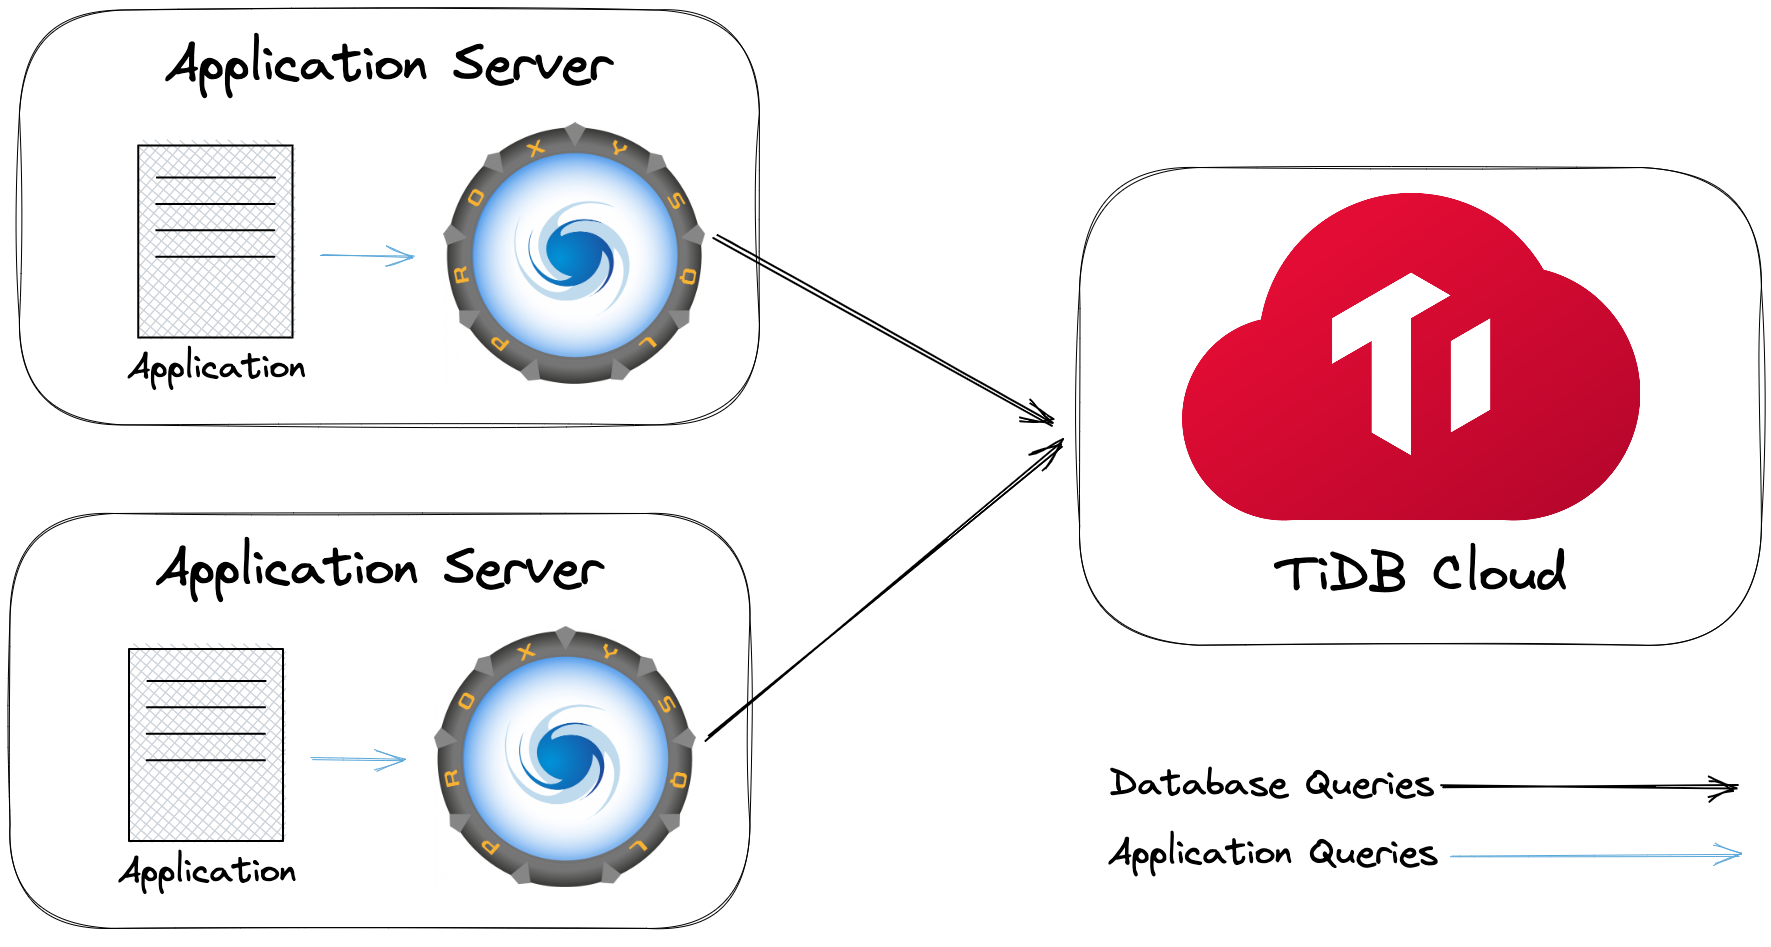
Deployment architecture
The most obvious way to deploy ProxySQL with TiDB is to add ProxySQL as a standalone intermediary between the application layer and TiDB. However, the scalability and failure tolerance are not guaranteed, and it also adds additional latency due to network hop. To avoid these problems, an alternate deployment architecture is to deploy ProxySQL as a sidecar as below:
Development environment
This section describes how to integrate TiDB with ProxySQL in a development environment. To get started with the ProxySQL integration, you can choose either of the following options depending on your TiDB cluster type after you have all the prerequisites in place.
- Option 1: Integrate TiDB Cloud with ProxySQL
- Option 2: Integrate TiDB (self-hosted) with ProxySQL
Prerequisites
Depending on the option you choose, you might need the following packages:
You can follow the installation instructions as below:
- macOS
- CentOS
- Windows
Download and start Docker (the Docker Desktop already includes the Docker Compose).
Run the following command to install Python and
mysql-client:/bin/bash -c "$(curl -fsSL https://raw.githubusercontent.com/Homebrew/install/HEAD/install.sh)" brew install python mysql-client
curl -fsSL https://get.docker.com | bash -s docker
yum install -y git python39 docker-ce docker-ce-cli containerd.io docker-compose-plugin mysql
systemctl start docker
Download and install Git.
Download the 64-bit Git for Windows Setup package from the Git Windows Download page.
Install the Git package by following the setup wizard. You can click Next for a few times to use the default installation settings.

Download and install MySQL Shell.
Download the ZIP file of MySQL Installer from the MySQL Community Server Download page.
Unzip the file, and locate
mysql.exein thebinfolder. You need to add the path of thebinfolder to the system variable and set it into thePATHvariable at Git Bash:echo 'export PATH="(your bin folder)":$PATH' >>~/.bash_profile source ~/.bash_profileFor example:
echo 'export PATH="/c/Program Files (x86)/mysql-8.0.31-winx64/bin":$PATH' >>~/.bash_profile
source ~/.bash_profile
Download and install Docker.
Download Docker Desktop installer from the Docker Download page.
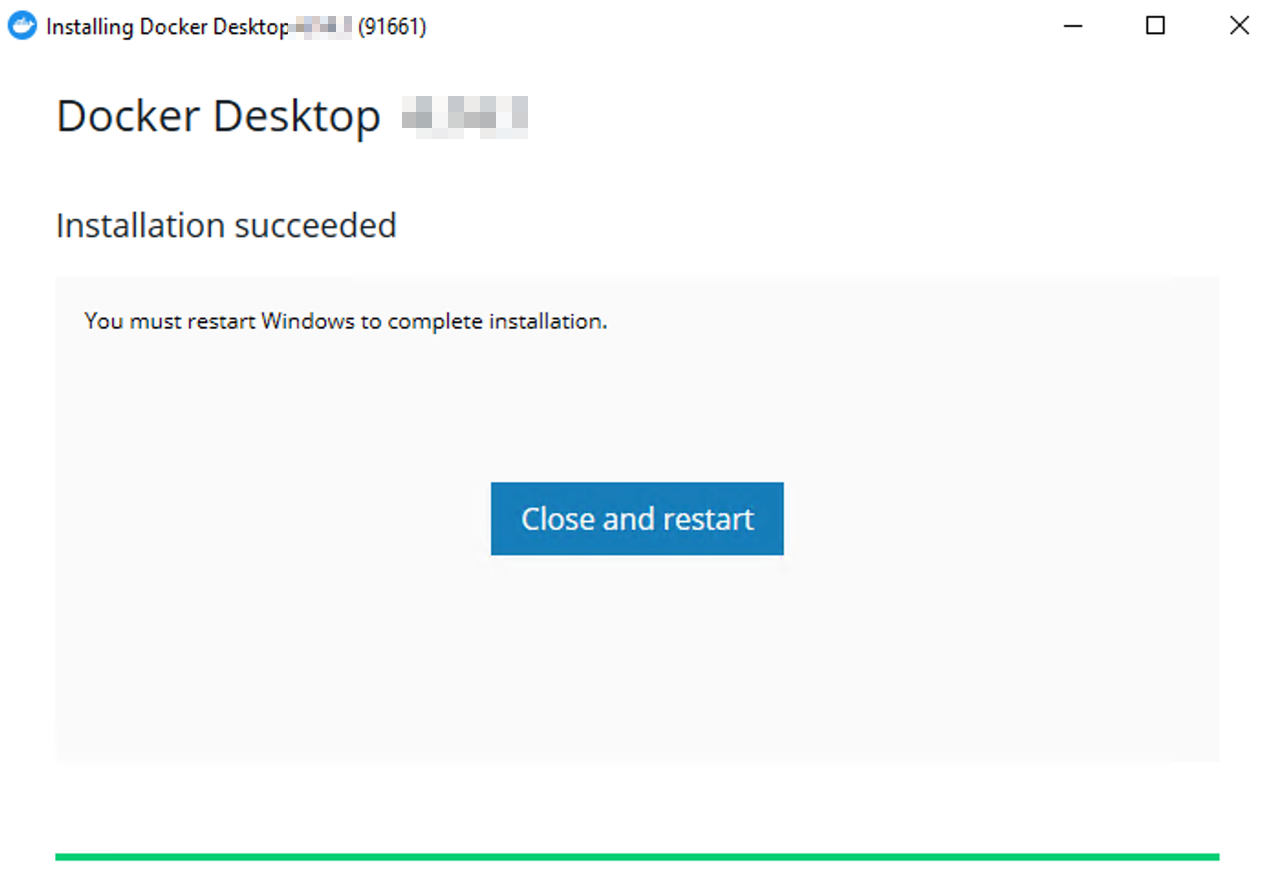
Double-click the installer to run it. After the installation is completed, you will be prompted for a restart.
Download the latest Python 3 installer from the Python Download page and run it.
Option 1: Integrate TiDB Cloud with ProxySQL
For this integration, you will be using the ProxySQL Docker image along with a TiDB Serverless Tier cluster. The following steps will set up ProxySQL on port 16033, so make sure this port is available.
Step 1. Create a TiDB Cloud Serverless Tier cluster
Create a free TiDB Serverless Tier cluster. Remember the root password that you set for your cluster.
Get your cluster hostname, port, and username for later use.
- On the Clusters page, click your cluster name to go to the cluster overview page.
- On the cluster overview page, locate the Connection pane, and then copy the
Endpoint,Port, andUserfields, where theEndpointis your cluster hostname.
Step 2. Generate ProxySQL configuration files
Clone the integration example code repository for TiDB and ProxySQL:
- macOS
- CentOS
- Windows (Git Bash)
git clone https://github.com/pingcap-inc/tidb-proxysql-integration.gitgit clone https://github.com/pingcap-inc/tidb-proxysql-integration.gitgit clone https://github.com/pingcap-inc/tidb-proxysql-integration.gitChange to the
tidb-cloud-connectfolder:- macOS
- CentOS
- Windows (Git Bash)
cd tidb-proxysql-integration/example/tidb-cloud-connectcd tidb-proxysql-integration/example/tidb-cloud-connectcd tidb-proxysql-integration/example/tidb-cloud-connectGenerate ProxySQL configuration files by running
proxysql-config.py:- macOS
- CentOS
- Windows (Git Bash)
python3 proxysql-config.pypython3 proxysql-config.pypython proxysql-config.pyWhen prompted, enter the endpoint of your cluster for
Serverless Tier Host, and then enter the username and the password of your cluster.The following is an example output. You will see that three configuration files are generated under the current
tidb-cloud-connectfolder.[Begin] generating configuration files.. tidb-cloud-connect.cnf generated successfully. proxysql-prepare.sql generated successfully. proxysql-connect.py generated successfully. [End] all files generated successfully and placed in the current folder.
Step 3. Configure ProxySQL
Start Docker. If Docker has already started, skip this step:
- macOS
- CentOS
- Windows
Double-click the icon of the installed Docker to start it.
systemctl start dockerDouble-click the icon of the installed Docker to start it.
Pull the ProxySQL image and start a ProxySQL container in the background:
- macOS
- CentOS
- Windows (Git Bash)
docker compose up -ddocker compose up -ddocker compose up -dIntegrate with ProxySQL by running the following command, which executes
proxysql-prepare.sqlinside ProxySQL Admin Interface:- macOS
- CentOS
- Windows (Git Bash)
docker compose exec proxysql sh -c "mysql -uadmin -padmin -h127.0.0.1 -P6032 < ./proxysql-prepare.sql"docker compose exec proxysql sh -c "mysql -uadmin -padmin -h127.0.0.1 -P6032 < ./proxysql-prepare.sql"docker compose exec proxysql sh -c "mysql -uadmin -padmin -h127.0.0.1 -P6032 < ./proxysql-prepare.sql"The following is an example output. You will see that the hostname of your cluster is shown in the output, which means that the connectivity between ProxySQL and the TiDB Serverless Tier cluster is established.
*************************** 1. row ***************************
    hostgroup_id: 0
        hostname: gateway01.us-west-2.prod.aws.tidbcloud.com
            port: 4000
        gtid_port: 0
            status: ONLINE
            weight: 1
        compression: 0
    max_connections: 1000
max_replication_lag: 0
            use_ssl: 1
    max_latency_ms: 0
            comment:
Step 4. Connect to your TiDB cluster through ProxySQL
To connect to your TiDB cluster, run
proxysql-connect.py. The script will automatically launch the MySQL client and use the username and password you specified in Step 2 for connection.- macOS
- CentOS
- Windows (Git Bash)
python3 proxysql-connect.pypython3 proxysql-connect.pypython proxysql-connect.pyAfter connecting to your TiDB cluster, you can use the following SQL statement to validate the connection:
SELECT VERSION();If the TiDB version is displayed, you are successfully connected to your TiDB Serverless Tier cluster through ProxySQL. To exit from the MySQL client anytime, enter
quitand press enter.To stop and remove containers, and go to the previous directory, run the following command:
- macOS
- CentOS
- Windows (Git Bash)
docker compose down
cd -
docker compose down cd -docker compose down cd -
Option 2: Integrate TiDB (self-hosted) with ProxySQL
For this integration, you will set up an environment using Docker images of TiDB and ProxySQL. You are encouraged to try other ways of installing TiDB (self-hosted) in your own interest.
The following steps will set up ProxySQL and TiDB on ports 6033 and 4000 respectively, so make sure these ports are available.
Start Docker. If Docker has already started, skip this step:
- macOS
- CentOS
- Windows
Double-click the icon of the installed Docker to start it.
systemctl start dockerDouble-click the icon of the installed Docker to start it.
Clone the integration example code repository for TiDB and ProxySQL:
- macOS
- CentOS
- Windows (Git Bash)
git clone https://github.com/pingcap-inc/tidb-proxysql-integration.gitgit clone https://github.com/pingcap-inc/tidb-proxysql-integration.gitgit clone https://github.com/pingcap-inc/tidb-proxysql-integration.gitPull the latest images of ProxySQL and TiDB:
- macOS
- CentOS
- Windows (Git Bash)
cd tidb-proxysql-integration && docker compose pullcd tidb-proxysql-integration && docker compose pullcd tidb-proxysql-integration && docker compose pullStart an integrated environment using both TiDB and ProxySQL running as containers:
- macOS
- CentOS
- Windows (Git Bash)
docker compose up -ddocker compose up -ddocker compose up -dTo log in to the ProxySQL
6033port, you can use therootusername with an empty password.Connect to TiDB via ProxySQL:
- macOS
- CentOS
- Windows (Git Bash)
mysql -u root -h 127.0.0.1 -P 6033mysql -u root -h 127.0.0.1 -P 6033mysql -u root -h 127.0.0.1 -P 6033After connecting to your TiDB cluster, you can use the following SQL statement to validate the connection:
SELECT VERSION();If the TiDB version is displayed, you are successfully connected to your TiDB containers through ProxySQL.
To stop and remove containers, and go to the previous directory, run the following command:
- macOS
- CentOS
- Windows (Git Bash)
docker compose down
cd -
docker compose down cd -docker compose down cd -
Production environment
For a production environment, it is recommended that you use TiDB Cloud directly for a fully-managed experience.
Prerequisite
Download and install a MySQL client. For example, MySQL Shell.
Integrate TiDB Cloud with ProxySQL on CentOS
ProxySQL can be installed on many different platforms. The following takes CentOS as an example.
For a full list of supported platforms and the corresponding version requirements, see ProxySQL documentation.
Step 1. Create a TiDB Cloud Dedicated Tier cluster
For detailed steps, see Create a TiDB Cluster.
Step 2. Install ProxySQL
Add ProxySQL to the YUM repository:
cat > /etc/yum.repos.d/proxysql.repo << EOF [proxysql] name=ProxySQL YUM repository baseurl=https://repo.proxysql.com/ProxySQL/proxysql-2.4.x/centos/\$releasever gpgcheck=1 gpgkey=https://repo.proxysql.com/ProxySQL/proxysql-2.4.x/repo_pub_key EOFInstall ProxySQL:
yum install -y proxysqlStart ProxySQL:
systemctl start proxysql
To learn more about the supported platforms of ProxySQL and their installation, refer to ProxySQL README or ProxySQL installation documentation.
Step 3. Configure ProxySQL
To use ProxySQL as a proxy for TiDB, you need to configure ProxySQL. To do so, you can either execute SQL statements inside ProxySQL Admin Interface (recommended) or use the configuration file.
Option 1: Configure ProxySQL using the Admin Interface
Reconfigure ProxySQL’s internals using the standard ProxySQL Admin interface, accessible via any MySQL command line client (available by default on port
6032):mysql -u admin -padmin -h 127.0.0.1 -P6032 --prompt 'ProxySQL Admin> 'The above step will take you to the ProxySQL admin prompt.
Configure the TiDB clusters to be used, where you can add one or multiple TiDB clusters to ProxySQL. The following statement will add one TiDB Cloud Dedicated Tier cluster for example. You need to replace
<tidb cloud dedicated cluster host>and<tidb cloud dedicated cluster port>with your TiDB Cloud endpoint and port (the default port is4000).INSERT INTO mysql_servers(hostgroup_id, hostname, port) VALUES ( 0, '<tidb cloud dedicated cluster host>', <tidb cloud dedicated cluster port> ); LOAD mysql servers TO runtime; SAVE mysql servers TO DISK;Configure Proxy login users to make sure that the users have appropriate permissions on the TiDB cluster. In the following statements, you need to replace 'tidb cloud dedicated cluster username' and 'tidb cloud dedicated cluster password' with the actual username and password of your cluster.
INSERT INTO mysql_users( username, password, active, default_hostgroup, transaction_persistent ) VALUES ( '<tidb cloud dedicated cluster username>', '<tidb cloud dedicated cluster password>', 1, 0, 1 ); LOAD mysql users TO runtime; SAVE mysql users TO DISK;
Option 2: Configure ProxySQL using a configuration file
This option should only be considered as an alternate method for configuring ProxySQL. For more information, see Configuring ProxySQL through the config file.
Delete any existing SQLite database (where configurations are stored internally):
rm /var/lib/proxysql/proxysql.dbModify the configuration file
/etc/proxysql.cnfaccording to your need. For example:mysql_servers: ( { address="<tidb cloud dedicated cluster host>" port=<tidb cloud dedicated cluster port> hostgroup=0 max_connections=2000 } ) mysql_users: ( { username = "<tidb cloud dedicated cluster username>" password = "<tidb cloud dedicated cluster password>" default_hostgroup = 0 max_connections = 1000 default_schema = "test" active = 1 transaction_persistent = 1 } )In the preceding example:
addressandport: specify the endpoint and port of your TiDB Cloud cluster.usernameandpassword: specify the username and password of your TiDB Cloud cluster.
Restart ProxySQL:
systemctl restart proxysqlAfter the restart, the SQLite database will be created automatically.
Typical scenario
This section takes query routing as an example to show some of the benefits that you can leverage by integrating ProxySQL with TiDB.
Query rules
Databases can be overloaded by high traffic, faulty code, or malicious spam. With query rules of ProxySQL, you can respond to these issues quickly and effectively by rerouting, rewriting, or rejecting queries.
Clone the integration example code repository for TiDB and ProxySQL. Skip this step if you have already cloned it in the previous steps.
- macOS
- CentOS
- Windows (Git Bash)
git clone https://github.com/pingcap-inc/tidb-proxysql-integration.gitgit clone https://github.com/pingcap-inc/tidb-proxysql-integration.gitgit clone https://github.com/pingcap-inc/tidb-proxysql-integration.gitChange to the example directory for ProxySQL rules:
- macOS
- CentOS
- Windows (Git Bash)
cd tidb-proxysql-integration/example/proxy-rule-admin-interfacecd tidb-proxysql-integration/example/proxy-rule-admin-interfacecd tidb-proxysql-integration/example/proxy-rule-admin-interfaceRun the following command to start two TiDB containers and a ProxySQL container:
- macOS
- CentOS
- Windows (Git Bash)
docker compose up -ddocker compose up -ddocker compose up -dIf everything goes well, the following containers are started:
- Two Docker containers of TiDB clusters exposed via ports
4001,4002 - One ProxySQL Docker container exposed via port
6034.
In the two TiDB containers, using
mysqlto create a table with a similar schema definition and then insert different data ('tidb-server01-port-4001','tidb-server02-port-4002') to identify these containers.- macOS
- CentOS
- Windows (Git Bash)
mysql -u root -h 127.0.0.1 -P 4001 << EOF DROP TABLE IF EXISTS test.tidb_server; CREATE TABLE test.tidb_server (server_name VARCHAR(255)); INSERT INTO test.tidb_server (server_name) VALUES ('tidb-server01-port-4001'); EOF mysql -u root -h 127.0.0.1 -P 4002 << EOF DROP TABLE IF EXISTS test.tidb_server; CREATE TABLE test.tidb_server (server_name VARCHAR(255)); INSERT INTO test.tidb_server (server_name) VALUES ('tidb-server02-port-4002'); EOFmysql -u root -h 127.0.0.1 -P 4001 << EOF DROP TABLE IF EXISTS test.tidb_server; CREATE TABLE test.tidb_server (server_name VARCHAR(255)); INSERT INTO test.tidb_server (server_name) VALUES ('tidb-server01-port-4001'); EOF mysql -u root -h 127.0.0.1 -P 4002 << EOF DROP TABLE IF EXISTS test.tidb_server; CREATE TABLE test.tidb_server (server_name VARCHAR(255)); INSERT INTO test.tidb_server (server_name) VALUES ('tidb-server02-port-4002'); EOFmysql -u root -h 127.0.0.1 -P 4001 << EOF DROP TABLE IF EXISTS test.tidb_server; CREATE TABLE test.tidb_server (server_name VARCHAR(255)); INSERT INTO test.tidb_server (server_name) VALUES ('tidb-server01-port-4001'); EOF mysql -u root -h 127.0.0.1 -P 4002 << EOF DROP TABLE IF EXISTS test.tidb_server; CREATE TABLE test.tidb_server (server_name VARCHAR(255)); INSERT INTO test.tidb_server (server_name) VALUES ('tidb-server02-port-4002'); EOFConfigure ProxySQL by running the following command, which executes
proxysql-prepare.sqlinside ProxySQL Admin Interface to establish a proxy connection between the TiDB containers and ProxySQL.- macOS
- CentOS
- Windows (Git Bash)
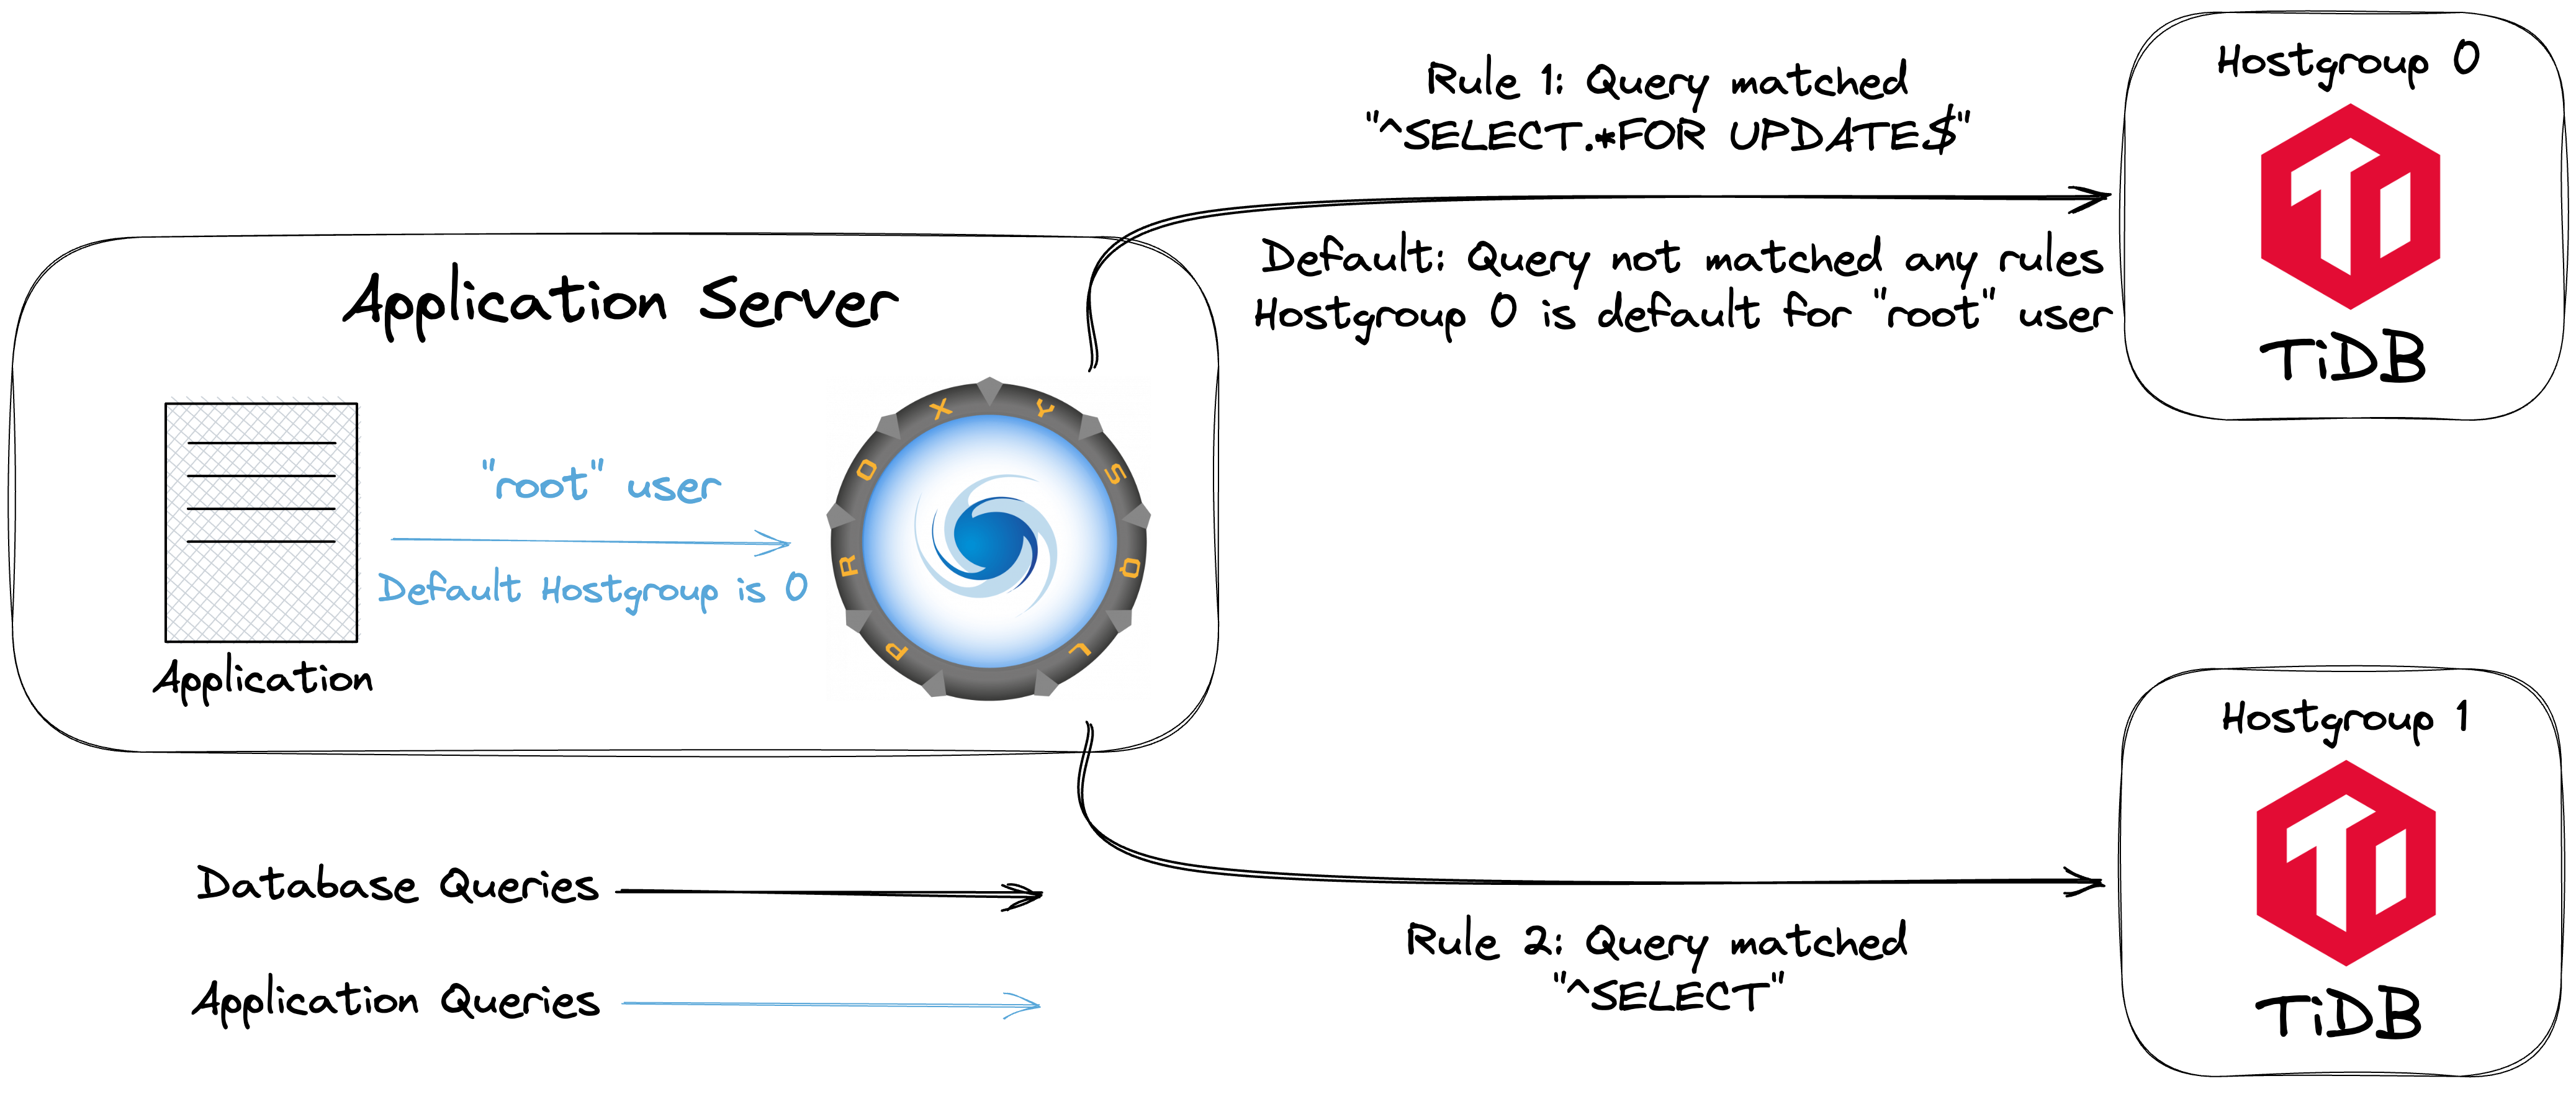
docker compose exec proxysql sh -c "mysql -uadmin -padmin -h127.0.0.1 -P6032 < ./proxysql-prepare.sql"docker compose exec proxysql sh -c "mysql -uadmin -padmin -h127.0.0.1 -P6032 < ./proxysql-prepare.sql"docker compose exec proxysql sh -c "mysql -uadmin -padmin -h127.0.0.1 -P6032 < ./proxysql-prepare.sql"The following is some additional information about how ProxySQL patterns match query rules:
- ProxySQL tries to match the rules one by one in the ascending order of
rule_id. ^symbol matches the beginning of a SQL statement and$matches the end.
For more information about ProxySQL regular expression and pattern matching, see mysql-query_processor_regex in ProxySQL documentation.
For a full list of parameters, see mysql_query_rules in ProxySQL documentation.
Verify the configuration and check whether the query rules work.
Log into ProxySQL MySQL Interface as the
rootuser:- macOS
- CentOS
- Windows (Git Bash)
mysql -u root -h 127.0.0.1 -P 6034mysql -u root -h 127.0.0.1 -P 6034mysql -u root -h 127.0.0.1 -P 6034Execute the following SQL statements:
Execute a
SELECTstatement:SELECT * FROM test.tidb_server;This statement will match rule_id
2and forward the statement to the TiDB cluster onhostgroup 1.Execute a
SELECT ... FOR UPDATEstatement:SELECT * FROM test.tidb_server FOR UPDATE;This statement will match rule_id
1and forward the statement to the TiDB cluster onhostgroup 0.Start a transaction:
BEGIN; INSERT INTO test.tidb_server (server_name) VALUES ('insert this and rollback later'); SELECT * FROM test.tidb_server; ROLLBACK;In this transaction, the
BEGINstatement will not match any rules. It uses the default hostgroup (hostgroup 0in this example). Because ProxySQL enables user transaction_persistent by default, which will execute all statements within the same transaction in the same hostgroup, theINSERTandSELECT * FROM test.tidb_server;statements will also be forwarded to the TiDB clusterhostgroup 0.
The following is an example output. If you get a similar output, you have successfully configured the query rules with ProxySQL.
+-------------------------+ | server_name | +-------------------------+ | tidb-server02-port-4002 | +-------------------------+ +-------------------------+ | server_name | +-------------------------+ | tidb-server01-port-4001 | +-------------------------+ +--------------------------------+ | server_name | +--------------------------------+ | tidb-server01-port-4001 | | insert this and rollback later | +--------------------------------+To exit from the MySQL client anytime, enter
quitand press enter.
To stop and remove containers, and go to the previous directory, run the following command:
- macOS
- CentOS
- Windows (Git Bash)
docker compose down cd -docker compose down cd -docker compose down cd -