TiDB Binlog Local 部署方案
TiDB Binlog Local 简介
TiDB Binlog 是用于收集 TiDB 的 Binlog,并提供实时备份和同步功能的商业工具。
TiDB Binlog 支持以下功能场景:
- 数据同步:同步 TiDB 集群数据到其他数据库。
- 实时备份和恢复:备份 TiDB 集群数据,同时可以用于 TiDB 集群故障时恢复。
TiDB Binlog Local 架构
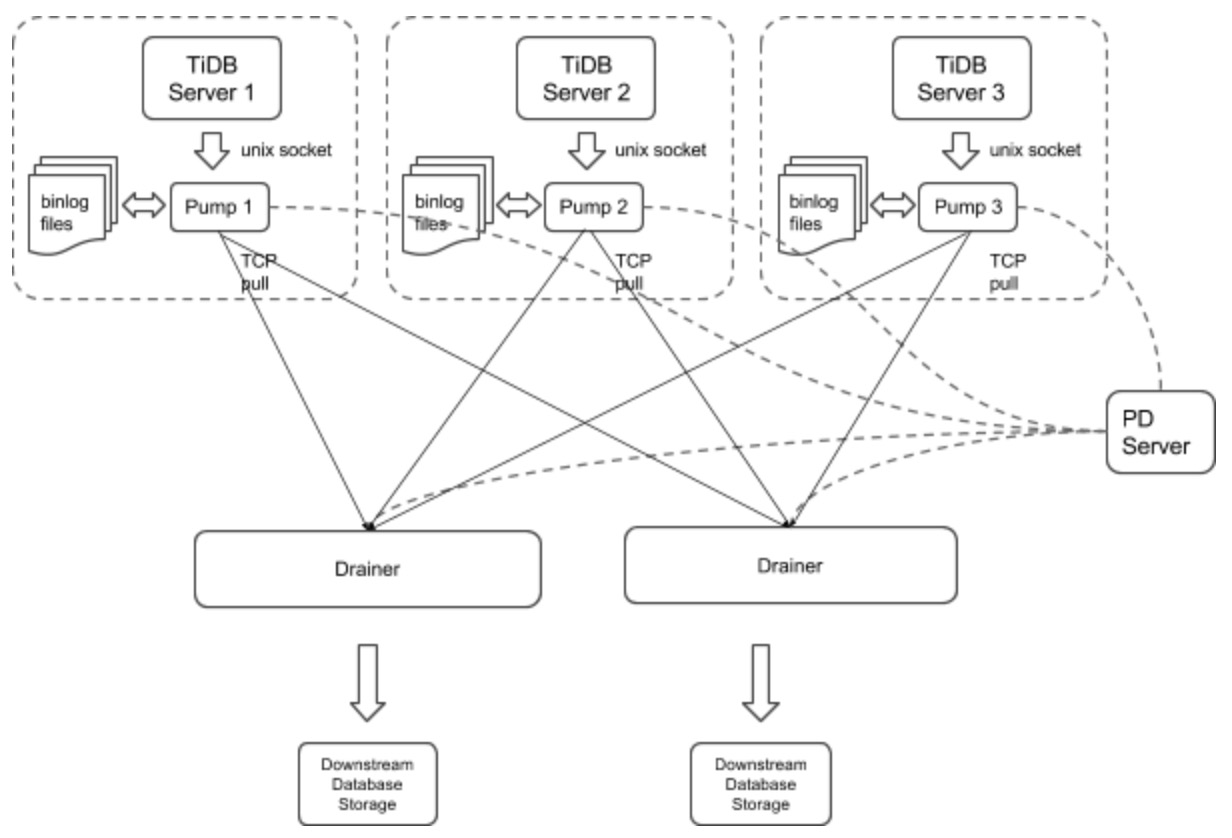
下图为 TiDB Binlog Local的整体架构。

TiDB Binlog Local 主要分为两个组件:
Pump 是一个守护进程,在每个 TiDB 的主机上后台运行。他的主要功能是实时记录 TiDB 产生的 Binlog 并顺序写入磁盘文件
Drainer 从各个 Pump 节点收集 Binlog,并按照在 TiDB 中事务的提交顺序转化为指定数据库兼容的 SQL 语句,最后同步到目的数据库或者写到顺序文件
TiDB Binlog Local 安装
TiDB Binlog Local 下载
TiDB Binlog 包含在 tidb-enterprise-tools 安装包中,可在此下载。
TiDB Binlog Local 部署
注意
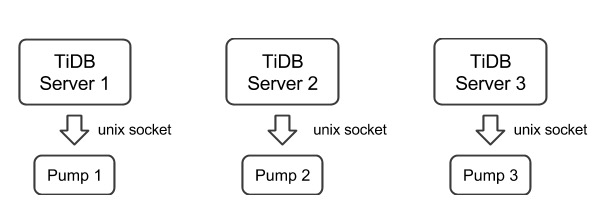
需要为一个 TiDB 集群中的每台 TiDB server 部署一个 Pump,目前 TiDB server 只支持以 unix socket 方式的输出 binlog。
手动部署时, 启动顺序为: Pump > TiDB,停止顺序为 TiDB > Pump
我们设置 TiDB 启动参数 binlog-socket 为对应的 Pump 的参数 socket 所指定的 unix socket 文件路径,最终部署结构如下图所示:

drainer 不支持对 ignore schemas(在过滤列表中的 schemas) 的 table 进行 rename DDL 操作
在已有的 TiDB 集群中启动 drainer,一般需要全量备份 并且获取 savepoint,然后导入全量备份,最后启动 drainer 从 savepoint 开始同步。
为了保证数据的完整性,在 pump 运行 10 分钟左右后按顺序进行下面的操作
- 以 gen-savepoint model 运行 drainer 生成 drainer savepint 文件,
bin/drainer -gen-savepoint --data-dir= ${drainer_savepoint_dir} --pd-urls=${pd_urls} - 全量备份,例如 Mydumper 备份 tidb
- 全量导入备份到目标系统
- 设置 savepoint 文件路径,然后启动 drainer,
bin/drainer --config=conf/drainer.toml --data-dir=${drainer_savepoint_dir}
- 以 gen-savepoint model 运行 drainer 生成 drainer savepint 文件,
drainer 输出的 pb, 需要在配置文件设置下面的参数
[syncer]
db-type = "pb"
disable-dispatch = true

[syncer.to]
dir = "/path/pb-dir"
使用 TiDB Ansible 部署 Pump (推荐)
搭建全新的 TiDB Cluster,启动顺序 pd-server -> tikv-server -> pump -> tidb-server -> drainer
- 修改 tidb-ansible inventory.ini 文件
- enable_binlog = True
- 执行 ansible-playbook deploy.yml
- 执行 ansible-playbook start.yml
- drainer 目前需要手动部署
- 修改 tidb-ansible inventory.ini 文件
对已有的 TiDB Cluster 部署 binlog
- 修改 tidb-ansible inventory.ini 文件
- enable_binlog = True
- 执行 ansible-playbook rolling_update.yml --tags=tidb
- drainer 目前需要手动部署
- 修改 tidb-ansible inventory.ini 文件
使用 Binary 部署 Pump
PUMP 命令行参数说明
Usage of pump:
-L string
    日志输出信息等级设置: debug, info, warn, error, fatal (默认 "info")
-V
    打印版本信息
-addr string
    pump 提供服务的 rpc 地址(默认 "127.0.0.1:8250")
-advertise-addr string
    pump 对外提供服务的 rpc 地址(默认 "127.0.0.1:8250")
-config string
    配置文件路径,如果你指定了配置文件,pump 会首先读取配置文件的配置
    如果对应的配置在命令行参数里面也存在,pump 就会使用命令行参数的配置来覆盖配置文件里面的
-data-dir string
    pump 数据存储位置路径
-gc int
    日志最大保留天数 (默认 7), 设置为 0 可永久保存
-heartbeat-interval uint
    pump 向 pd 发送心跳间隔 (单位 秒)
-log-file string
    log 文件路径
-log-rotate string
    log 文件切换频率, hour/day
-metrics-addr string
   prometheus Pushgateway 地址,不设置则禁止上报监控信息
-metrics-interval int
   监控信息上报频率 (默认 15,单位 秒)
-pd-urls string
    pd 集群节点的地址 (默认 "http://127.0.0.1:2379")
-socket string
    unix socket 模式服务监听地址 (默认 unix:///tmp/pump.sock)
PUMP 配置文件
# pump Configuration.
# pump 提供服务的 rpc 地址(默认 "127.0.0.1:8250")
addr = "127.0.0.1:8250"
# pump 对外提供服务的 rpc 地址(默认 "127.0.0.1:8250")
advertise-addr = ""
# binlog 最大保留天数 (默认 7), 设置为 0 可永久保存
gc = 7
#  pump 数据存储位置路径
data-dir = "data.pump"
# pump 向 pd 发送心跳间隔 (单位 秒)
heartbeat-interval = 3
# pd 集群节点的地址 (默认 "http://127.0.0.1:2379")
pd-urls = "http://127.0.0.1:2379"
# unix socket 模式服务监听地址 (默认 unix:///tmp/pump.sock)
socket = "unix:///tmp/pump.sock"
启动示例
```bash
./bin/pump -config pump.toml
```
使用 Binary 部署 Drainer
Drainer 命令行参数说明
Usage of drainer:
-L string
    日志输出信息等级设置: debug, info, warn, error, fatal (默认 "info")
-V
    打印版本信息
-addr string
    drainer 提供服务的地址(默认 "127.0.0.1:8249")
-c int
    同步下游的并发数,该值设置越高同步的吞吐性能越好 (default 1)
-config string
   配置文件路径, drainer 会首先读取配置文件的配置
   如果对应的配置在命令行参数里面也存在,drainer 就会使用命令行参数的配置来覆盖配置文件里面的
-data-dir string
   drainer 数据存储位置路径 (默认 "data.drainer")
-dest-db-type string
    drainer 下游服务类型 (默认为 mysql)
-detect-interval int
    向 pd 查询在线 Pump 的时间间隔 (默认 10,单位 秒)
-disable-dispatch
    是否禁用拆分单个 binlog 的 sqls 的功能,如果设置为 true,则按照每个 binlog
    顺序依次还原成单个事务进行同步( 下游服务类型为 mysql, 该项设置为 False )
-gen-savepoint
    如果设置为 true, 则只生成 drainer 的 savepoint meta 文件, 可以配合 Mydumper 使用
-ignore-schemas string
    db 过滤列表 (默认 "INFORMATION_SCHEMA,PERFORMANCE_SCHEMA,mysql,test"),
    不支持对 ignore schemas 的 table 进行 rename DDL 操作
-log-file string
    log 文件路径
-log-rotate string
    log 文件切换频率, hour/day
-metrics-addr string
   Prometheus Pushgateway 地址,不设置则禁止上报监控信息
-metrics-interval int
   监控信息上报频率 (默认 15,单位 秒)
-pd-urls string
   pd 集群节点的地址 (默认 "http://127.0.0.1:2379")
-txn-batch int
   输出到下游数据库一个事务的 sql 数量 (default 1)
Drainer 配置文件
# drainer Configuration.

# drainer 提供服务的地址(默认 "127.0.0.1:8249")
addr = "127.0.0.1:8249"

# 向 pd 查询在线 pump 的时间间隔 (默认 10,单位 秒)
detect-interval = 10

# drainer 数据存储位置路径 (默认 "data.drainer")
data-dir = "data.drainer"

# pd 集群节点的地址 (默认 "http://127.0.0.1:2379")
pd-urls = "http://127.0.0.1:2379"

# log 文件路径
log-file = "drainer.log"

# Syncer Configuration.
[syncer]

## db 过滤列表 (默认 "INFORMATION_SCHEMA,PERFORMANCE_SCHEMA,mysql,test"),
## 不支持对 ignore schemas 的 table 进行 rename DDL 操作
ignore-schemas = "INFORMATION_SCHEMA,PERFORMANCE_SCHEMA,mysql"

# 输出到下游数据库一个事务的 sql 数量 (default 1)
txn-batch = 1

# 同步下游的并发数,该值设置越高同步的吞吐性能越好 (default 1)
worker-count = 1

# 是否禁用拆分单个 binlog 的 sqls 的功能,如果设置为 true,则按照每个 binlog
# 顺序依次还原成单个事务进行同步( 下游服务类型为 mysql, 该项设置为 False )
disable-dispatch = false

# drainer 下游服务类型 (默认为 mysql)
# 参数有效值为 "mysql", "pb"
db-type = "mysql"

# replicate-do-db priority over replicate-do-table if have same db name
# and we support regex expression ,
# 以 '~' 开始声明使用正则表达式

#replicate-do-db = ["~^b.*","s1"]

#[[syncer.replicate-do-table]]
#db-name ="test"
#tbl-name = "log"

#[[syncer.replicate-do-table]]
#db-name ="test"
#tbl-name = "~^a.*"

# db-type 设置为 mysql 时,下游数据库服务器参数
[syncer.to]
host = "127.0.0.1"
user = "root"
password = ""
port = 3306

# db-type 设置为 pb 时,存放 binlog 文件的目录
# [syncer.to]
# dir = "data.drainer"
启动示例
```bash
./bin/drainer -config drainer.toml
```
TiDB Binlog Local 监控
这部分主要对 TiDB Binlog 的状态、性能做监控,通过 Prometheus + Grafana 展现 metrics 数据,
pump/drainer 配置
使用 TiDB Ansible 部署的 Pump 服务,已经在启动参数设置 metrics 。
Drainer 启动时可以设置 --metrics-addr 和 --metrics-interval 两个参数,其中 metrics-addr 设为 Push Gateway 的地址,metrics-interval 为 push 的频率,单位为秒,默认值为15
Grafana 配置
进入 Grafana Web 界面(默认地址:
http://localhost:3000,默认账号: admin 密码: admin)点击 Grafana Logo -> 点击 Data Sources -> 点击 Add data source -> 填写 data source 信息 ( 注: Type 选 Prometheus,Url 为 Prometheus 地址,根据实际情况 添加/填写 )
导入 Dashboard 配置文件
点击 Grafana Logo -> 点击 Dashboards -> 点击 Import -> 选择需要的 dashboard 配置文件上传 -> 选择对应的 data source